DDQ THU 2021-09-30
17. Preliminary & Detailed Design
17.1. Agenda
General Announcements
Bookkeeping
Discussion & Activity
Category |
Assignment |
Day |
Date |
|---|---|---|---|
Term Project |
FRI |
2021-10-08 |
17.2. Bookkeeping
Important
See Piazza @57 to setup a Figma account if you have not done so already.
17.3. Activity
17.3.1. Introduction
Without informed design, technology is more likely to be bad than good.
—Bill Buxton, Sketching User Experiences [1]
In an interaction design process, the preliminary design and detailed design phases yield system designs of varying fidelity that allow teams to explore design ideas and show the intention behind a design feature or the overall design concept to various stakeholders before investing more resources into development.
The fidelity of a design often serves as a mapping between the amount of time or energy needed to create the design and the status of elements the design illustrates.
Fidelity |
Energy / Time |
Status |
|---|---|---|
low |
less |
work in progress |
high |
more |
close to finished |
In Sketching User Experiences [1], the author, Bill Buxton, notes that separating design from the process of making is a trend that dates back to at least the late medieval period. In many cases, the output of requirements analysis is not enough to produce a working system that meets the project’s user experience requirements. Preliminary design consists of high-level design activities that start to bridge that gap.
- architectural design
- preliminary design
- sketching
For user experience and interaction design, preliminary design (or sketching) consists of mapping out the high-level concepts such as the user, controls, interface displays, navigation mechanisms, and overall workflow [TB:1].
Note
In a future DDQ, we will discuss “ideation,” a brainstorming component of preliminary design that facilitates a structured approach to that phase’s activities.
- sketch
A simply or hastily executed drawing that designers use to propose, explore, refine, and communicate design ideas.

Fig. 17.1 A hand-drawn sketch of a portable audio player.
- wireframe
A low-fidelity sketch of a system or user interface that contains the most essential elements and content related to a set of user experience requirements.
The meaning of “detailed design” can vary from discipline to discipline; however almost all the definitions either accomodate or explicitly mention prototype creation as a relevant activity.
- detailed design
- prototyping
For user experience and interaction design, detailed design (or prototyping) entails planning out all of the operations that take place between a user and interactive system to a level where only implementation and technical details remain [TB:1].
- mockup
A mid or high-fidelity visual of a system or user interface that shows what the product is going to look like subject to a set of user experience requirements.
- prototype
A representation of the final product, usually presented with high-fidelity, which is meant to simulate user interaction. Unlike a wireframe or mockup, a prototype is usable (e.g., clickable) to some extent and thus allows a user to experience the design via actual interactions.
The entirety of a prototype need not be expressed in high-fidelity. It may be sufficient or desirable to limit the expression of fidelity in different parts of a prototype based on relevance to some user experience requirement.
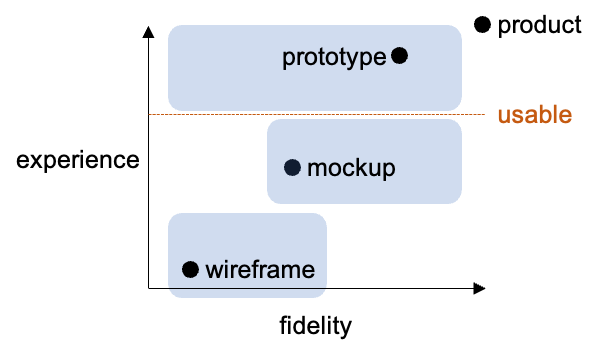
Fig. 17.2 The differences between wireframes, mockups, and prototypes are often easier to observe when the degree of user experience they permit is considered in addition to their fidelity.
Some good examples of lower-fidelity prototypes include those made by Palm Inc (defunct as of July 2010) for the PalmPilot, the company’s second generation of personal digital assistant (PDA) that it released in March 1997. The impact of the PalmPilot was substantial: a few years after its release, multiple companies began combining PDAs and cell phones, resulting in what we now sometimes refer to as smart phones.
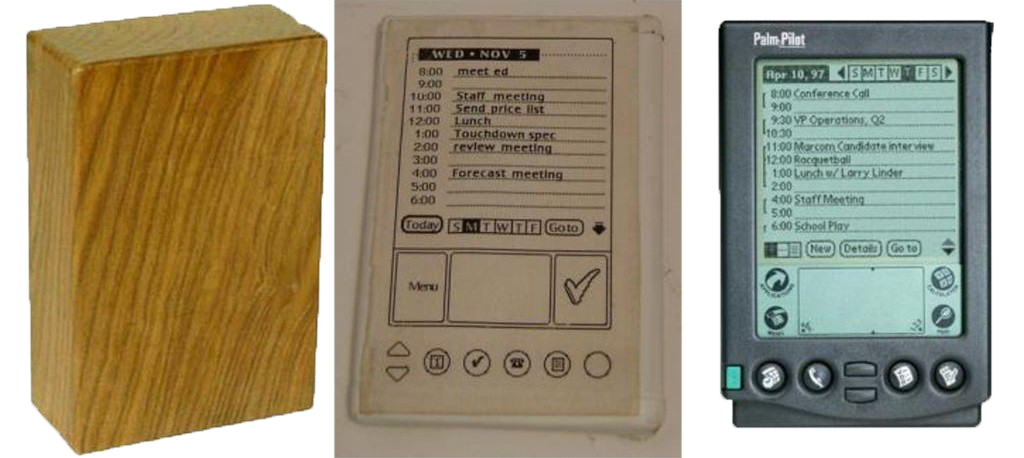
Fig. 17.3 Three different prototypes of the Palm Pilot cellphone: first, a plain wooden block; second, a painted wooden block with a user interface illustration affixed to its face; and third, machined plastic and other materials combined into something that looks very much like the final product.
Software Tools
Some popular software tools for preliminary design and detailed design include Adobe XD and Figma. Other tools include:
Axure
Balsamiq Wireframes
Pencil
Sketch
UXPin
Here are some general terms that are common to many of those tools:
- design object
A construct that provides a description of something that may be used in a design project. Examples of design objects include, but are not limited to: basic shapes, text, images, and collections or groups of such constructs.
- canvas
- pasteboard
Likened to a painter’s canvas, the canvas (or pasteboard) for a design project is the backdrop on which the actual design objects are drawn or placed.
See also
- artboard
- frame
An artboard (or frame) is a design object representing some identifiable region of a screen, page, or similar concept that is often placed on a canvas or in another artboard within a design project.
See also
- component
A reusable and often named design object that is, itself, a composition involving one more design objects (e.g., a button). Many software tools allow for changes to a component to propagate to the various instances or uses of the component that appear on the canvas – this feature is what commonly differentiates instances from mere copies.
See also
17.3.2. Breakout Groups
Important
RANDOMIZE: Please move around to different tables and form a random group for this activity.
Quickly introduce yourselves to each other, if you don’t already know each other.
Pick a group representative. This person will be responsible for posting your breakout group’s response on Piazza before breakout group work ends for this activity.
Help your group representative complete the following steps to create a Figma team for your group and make a copy of a wireframe kit available for your use:
Click here to start the team creation process.
On the “Name your team” page, enter “HCI 2021fa 09-30 Group #”, replacing # with your breakout group number, then click the
Create teambutton.On the “Add your collaborators” page, enter the email addresses associated with each group member’s Figma account, then click the
Continuebutton.On the “Choose your team plan” page, click the
Choose Educationbutton.On the “Let’s make sure everything looks right” page, click the
Complete upgradebutton.Using the table below, find the wireframe kit that corresponds to your breakout group number, visit its Figma Community page, then click the
Duplicatebutton.Group #
Wireframe Kit
Author
License
1, 6, 11, 16
2, 7, 12, 17
3, 8, 13, 18
4, 9, 14, 19
5, 10, 15, 20
Once the duplicated kit is open, move it from your personal “Drafts” workspace into the “Team project” that Figma created for your Figma team:
Click on the
⌄chevron that appears next to the kit’s name just above the canvas.In the dropdown menu that appears, find and click the
Move to projectoption.In the overlay / dialog that appears, select the “Team project” for your breakout room team, then click the
Movebutton.
After completing the steps above, everyone who accepted their invite can find the same “Team project” page by visiting their Figma workspace, then selecting the team by name in the sidebar on the left side of the screen.
Help your group representative respond to the following in a followup discussion to Piazza @59.
List the names of your breakout group members.
Keeping in mind your breakout group’s assigned wireframe kit, pick an app or website that everyone in the group has used and pretend to be a group of designers tasked with duplicating the appearance of the app or website using your wireframe kit. Provide the name of the app, and, if possible, provide a screenshot.
Ask your group representative to create a new “Design file” within your Figma team’s “Team project” and give it the same name as the app or website your group has chosen. Within that design file, collaboratively create three or more frames that each approximate the appearance of a screen or page of your group’s app or website, then embed your creation into your group’s followup discussion.
For each frame that you created, provide a short description of the screen or page it represents. If possible, also include a screenhot of the original screen or page for comparison purposes.
As a group, discuss and comment on the work presented in other followup discussions until the breakout rooms end.
17.3.4. After Class
Before 11:55PM today, individually comment on another group’s post by replying to their followup discussion in Piazza @59.
Continue reading the Design module, and make sure you’re aware of current assignments and their due dates.
Extra Practice: Consider reproducing an app you use every day as a mockup in Adobe XD or Figma.
Additional References
Comments
Please keep the comments polite and constructive. In addition to whatever else you want to write, please comment on one aspect of a group’s post that you like and one aspect that you think needs improvement (e.g., you find that something is unclear or you don’t understand a justification). As always, be sure to provide a brief justification for each.